Tuesday, February 22, 2011

Wilton Gum Paste and Fondant - Lesson #3


We made a lot of new flowers this week!

Here's what we did in Lesson 3:
  • Assembled the calla lily from pieces made in Lesson #2
  • Added the calyx to the carnation and rose from Lesson #2
  • Created leaves
  • Created daisies
  • Created mums (using the mum base made in Lesson #1)
  • Covered a cake board in fondant
It is pretty amazing how finishing touches can really elevate a flower.  I thought that the carnation and rose looked much better with the addition of the calyx (green part).  I thought that the calyx on the calla lily looked odd, but I will need to play around with making more of those.  The leaves were easy and cute, if not super realistic looking. 

The daisies seem to be a fan favorite with people in the class and those that look at my pictures.  They are just so cheerful!  I don't think that I have made a proper mum yet -- mine came out too tight and not "poofy" enough.  Practice needed.

Finally, we covered a cardboard cake board in fondant.  This is for the base of our final project cake next week.  I don't see myself putting cakes on fondant-covered cake boards much in the future, but it was a good introduction to how to work with large circles of fondant.  The instructor brought in the "impression mats" sold by Wilton to make the fun design.

One complaint about the class: the class supply kit made by Wilton contains fondant cutters that are inferior.  Their design (cheap, unbalanced plastic) make it impossible to get clean cuts on shapes like the daisy or the rose.  Metal cutters would be so much better.

Next week: final cake project time!  I need to start designing my cake and preparing the decorations now.

Check out my post about Lesson #2.

Check out my post about Lesson #1.

Monday, February 21, 2011

Wilton Flowers and Cake Design - Lesson #2


Week 2 focused on royal icing flowers.  Royal icing is a sugar/water/egg white (or meringue powder) mix that dries very hard.  This lets you make cake decorations in advance and transfer them when you are ready.  As with most things in this class and gum paste and fondant, I wouldn't recommend eating these decorations since they aren't very tasty.  When I was a kid, my cousins and I would fight over who got the flowers on birthday cakes from the supermarket - I'm pretty sure they were royal icing roses and as kids we wanted the hit of pure sugar :)

Here's what we did in Lesson 2:
  • Created the royal icing rose.  Once again, I struggled with getting my rose to look like a rose.
  • Made the "apple blossom" (second picture)
  • Made the primrose (third picture)
  • Made rosebuds

I have not yet been able to figure out the right consistency for making icing roses.  With royal icing or with buttercream, they always seem too soft and "melty".  The practicing continues.  The apple blossom (I've heard of cherry blossoms, but not apple blossoms!) and primrose were a bit easier, although I think my icing curved up too high on the primrose.  I think a cake full of apple blossoms would be adorable -- maybe in rainbow colors!  I had a hard time getting the rosebuds to look correct, partially because I am left-handed and all the instructions and samples were done by right-handed people.  In the case of this flower, I think the handedness affects the direction of the blossoms.  I think that these are weird because I can't picture how they would lay out on a cake, since they are a flat side view of a flower, rather than an overhead view like all of the other flowers we've done.

Next week, more flowers!

Check out my post about Lesson #1.

Saturday, February 19, 2011

A Dairy, Soy, and Egg Free Cake


My good friend M recently found out that her sweet newborn baby F is intolerant to dairy, soy, and eggs.  If a baby can't eat these items, it means the mommy can't either!  M had a birthday recently and as someone who fully believes in the right to everyone to have birthday cake, no matter what their food allergies, I wanted to make sure that she got a cake she could eat.

I started searching for vegan cakes and frostings, since that would cover the dairy and egg free requirements.  The only issue after that was finding a recipe that didn't use a soy product like soy-based shortening.

I've made "wacky cake" before and think it is a great vegan option.  I made this version, in three 6" cake pans (I only used two of the layers for this cake).  Unfortunately, I had a lot of issues unmolding the cakes for some reason, so I needed to do some strategic covering up with frosting. 

I love peanut butter cups, so I thought a chocolate peanut butter frosting sounded good.  I found this frosting, although I substituted the unsweetened chocolate with Enjoy Life guaranteed dairy/soy free chocolate chips to be extra sure.  I cut down slightly on the amount of confectioner's sugar to compensate.  The frosting was a loose ganache texture at first, but thickened up considerably after some time in the refrigerator.  I poured the ganache between the layers and over the whole cake when it was first made (you can see the glossy top of the cake), but then spread the thickened frosting around the sides to smooth out the edges caused by the deformed cakes.  I could have spread it on top as well, but I liked the glossy look.  The thick frosting meant that I could also pipe some fun decorations on the cake :)  My only gripe about this frosting?  I HATE working with natural peanut butter.  I can't get the oil incorporated without getting it all over myself and my kitchen.  Worth it for an allergen free cake, though!

I can't wait to explore different flavor combination for dairy/egg/soy free cakes in the future.  Even my fiance A, who is skeptical of allergen free foods, thought this cake tasted great.

Bonus: for those who need a gluten free cake, in addition to vegan/soy free, Four Chickens has a GF version of the wacky cake.

Friday, February 18, 2011

Wilton Flowers and Cake Design - Lesson #1


After taking Decorating Basics, I signed up for the Gum Paste and Fondant and Flowers and Cake Design courses.  As with the other courses, this is a Wilton sponsored course taught in craft stores in four lessons of two hours each.

My understanding about this class is that it mainly focuses on royal icing flowers, but the first lesson focused on gum paste flowers.

Here's what we did in Lesson 1:
  • Learned a bit about working with gum paste and fondant (everyone in the class is also taking the gum paste and fondant course, so we had already covered the same information in that class)
  • Made the "button" flower
  • Made pansies

Wilton intends for this class to be taken after Decorating Basics, but before Gum Paste and Fondant.  This would make it the first introduction to gum paste/fondant, rather than a repeat like I experienced.  It still seems like there is an excess of overlap between the first lesson of this course and the gum paste/fondant course.

I do not like how the button flower looks and thought that this was a waste of time.  I don't like the fact that the student kit includes the single purpose fondant press to make these.  I like the pansies much better, although it is a bit challenging to get the petals to ruffle nicely.  As I'm learning in both courses, when making ruffled flowers, the thinner the gum paste, the better.

Wilton Class Resources

Thursday, February 17, 2011

Wilton Gum Paste and Fondant - Lesson #2


After last week's focus on preparing components, I was looking forward to this week's finished products.  Making fondant/gum paste flowers is time consuming, but fun!

Here's what we did in Lesson 2:
  • Created the bow
  • Created pieces for the calla lily (more about that next week)
  • Finished the rose
  • Finished the carnations
 I didn't like the bow at all.  I found it impossible to glue the bow loops together in a way that they would stick.  I think this would be easier to assemble before the loops completely dried so they would be a little more malleable.  The roses were a bit complicated, but my fingers started cooperating and figuring out the process after the first few layers of petals.  Carnations are the easiest flower, but I don't think I've figured out how to make the top of them look full.

The key to making fondant/gum paste flowers?  The thinner the layers, the better.

Check out my post about Lesson #1.

Wednesday, February 16, 2011

2011.02.10 - Pink Pasta, Apple Radish Salad, Rose Cake


I like doing a Valentine's Day/Anti-Valentine's Day dinner around the holiday.  This means, of course, having food that is pink and/or heart shaped!  In 2007, we made pink pasta and I wanted to revisit that idea with my KitchenAid pasta attachment, rather than the challenging-to-use handmade pasta roller we used last time!

Pasta with peas, ricotta, and sausage made with gluten free pasta

Homemade pasta is an easy food to make pink.  I actually forgot to color the dough, but adding a good amount of red food color to the cooking water did the trick.  This pasta isn't very "saucy" because it is just some ricotta with pasta cooking water, but I like it that way.  I like the combination of the cheese, peas, sausage, and pasta.

I've made the gluten free pasta before, and had similar issues this time with the rolling of the dough.  It takes a few turns to get the dough to stick together and make a sheet to go through the roller, but I think I'm managing to speed up the process.

Modifications: Omitted garlic and basil.

Apple, radish, walnut salad

I wanted to cut the apples and radishes into hearts, but unfortunately ran out of time.  I liked the orange juice-based dressing a lot and the apples and walnuts gave a good crunch.

Modifications: I used bagged salad mix instead of radicchio and used canola oil instead of walnut oil (who has that in the pantry?)

Gluten Free Chocolate Cake decorated with rose icing

I had a leftover 6" chocolate cake made from a gf cake mix in the freezer, and thought that would be the perfect base for experimenting with those beautiful icing roses.  I made the buttercream mentioned in the blog post (halving the recipe) and dyed it pink.  I am still having trouble getting smooth edges on my star tip decorations, need to investigate how to fix this!

Wednesday, February 9, 2011

Wilton Gum Paste and Fondant - Lesson #1


I enjoyed the Decorating Basics class and have always been very curious about working with fondant, so I signed up for this class.  As with the intro class, this is a Wilton sponsored course that is taught at craft stores throughout the country.  It is taught in four lessons of two hours each.

One of the most common comments I've gotten from friends and family is why bother putting fondant and gum paste on cakes if those materials aren't very tasty (Dad equated them to being like construction materials).  I love the smooth look that fondant can give cakes (and their ability to somewhat preserve a cake's freshness) and the instructor recommended using the good-tasting Marshmallow Fondant once we learn the basics using the easier consistency of the pre-made stuff.  As for gum paste, it is nice to have sculpted decorations on a cake in a food-safe material, although I agree you'd probably want nice tasting decorations on the cake too!

Here's what we did in Lesson 1:
  • Learned tips and how to overcome challenges in working with gum paste and fondant (ex: add some shortening if the fondant dries out and becomes crumbly, microwave a package of pre-made gum paste for no more than 10 seconds if it is too hard to work with)
  • Learned how to make a 50/50 gum paste/fondant mix and how to color this mixture
  • Learned how to make a glue out of gum paste dissolved in water for attaching gum paste and fondant
  • Learned how to roll out the 50/50 mix and cut it with a cutting tool
  • Made bow loops out of the rolled and cut fondant
  • Made flower bases (rose, mum, carnation) out of pure gum paste (flower petals coming next week)

The first class has a smaller "wow" factor than the first Decorating Basics class because you spent a lot of time making pieces that don't get assembled and finished until the next class (they need the extra time to dry out).  For example, my fiance's first response was "why did you make nipples?"  However, I do think that there will be some very cool looking final products as the class goes on.  Only preemptive complaint -- this course focuses a lot on flowers.  Let's have some more modern designs!

Wilton Class Resources

Tuesday, February 8, 2011

Wilton Decorating Basics - Lesson #4


Lesson #4 was the final class, which meant the whole time was spent decorating our final cake projects. We also spent a little time learning how to use piping gel to thin out icing for writing. I suspect that the writing I remember from cakes of my youth is just piping gel with some coloring, since it had a glossy and transparent look.

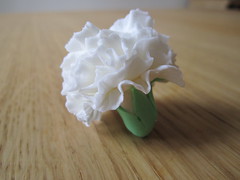
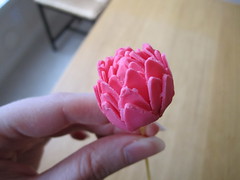
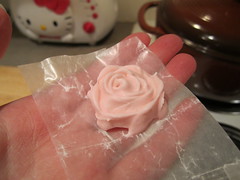
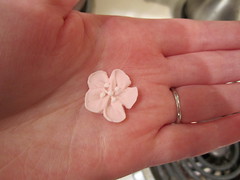
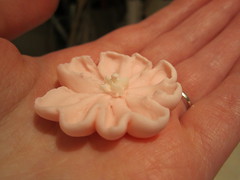
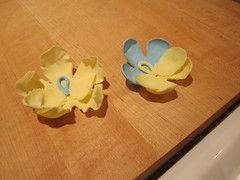
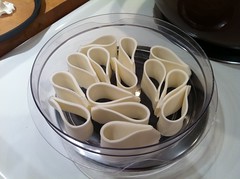
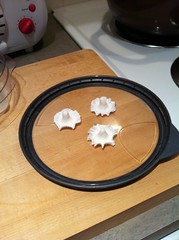
I was still having issues making proper icing roses (homemade icing just doesn't seem stiff enough to practice with) and forgot my flower nail at home, so I decided to have my cake center around the "drop flower".  I had some trouble getting the flowers to be more squat rather than tall, I suspect because of icing consistency issues. 

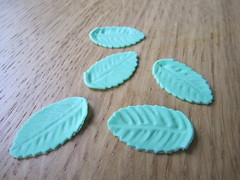
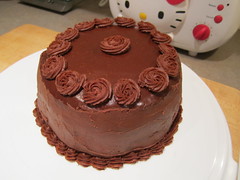
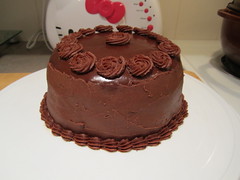
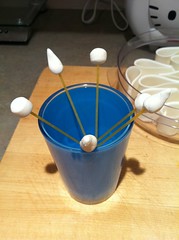
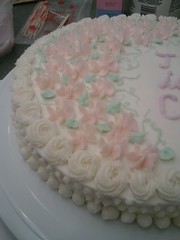
For the first time, I really "got" leaves and went nuts making cute little leaves (I added more to the cake after these pictures were taking because I had some time to kill).  I tried making some vines with the #1 tip, but the icing would have worked better if it had been thinner with some piping gel. 

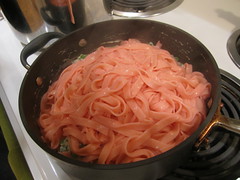
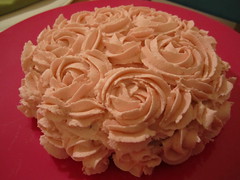
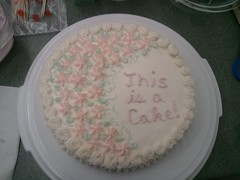
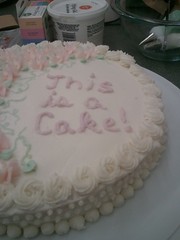
I love the rosette shape, so knew I wanted that to be my border, and decided to polka dot the side of the cake because it wasn't very attractive.  Pro tip: don't let your cake sit in the pan for an hour before unmolding.  Both of my 9" circles split in half when I tried to unmold and I ended up just having to patch together the least damaged one for this cake. 

I knew I wanted to practice writing, but couldn't figure out what to write (I knew this cake wouldn't be eaten because I don't like the taste of the Wilton frosting, so I wasn't making it for a particular occasion), so I went with the obvious :)  It is up to the Portal fans to decide if it is lying or not.

I treated the cake as more of a sampler than a proper design, hence some of its over the top nuttiness.

Overall, I enjoyed the course and definitely feel I am able to decorate cakes much more ably now, although nowhere near a professional-looking level.  As you would probably expect, the Wilton courses focus a lot on flowers and more traditional and kid-friendly designs -- they seem to be targeting moms who want to make birthday cakes for their kids.  In fact, one of my classmates had to bring her daughter to the final class, so they were decorating together and it was adorable. I am more into things like video game cakes and modern designs, but I think that these skills will be easily transferable.  And I do adore most designs made with the star tip :)

I would have preferred a faster moving course, but there is something to be said for the nice leisurely pace and it fits better with most of the people who take the class.  My overall investment was less than $75, including course registration (8 hours total class time), equipment (that I get to keep), and ingredients for icing, cookies, and cakes. 

I look forward to experimenting with icings that can be used for decorating but taste good (the Wilton recipe is gross) and continuing to make cake creations!  Stay tuned for posts about the other two Wilton classes I will be taking: Flowers and Cake Design and Gum Paste and Fondant.

Check out my post about Lesson #3.

Check out my post about Lesson #2.

Check out my post about Lesson #1.

Friday, February 4, 2011

2011.02.03 - Chili and Cornbread


Chili was the answer to the typical Seattle gray and rainy weather this week.  I have a go-to chili recipe, but I decided to branch out and try another one, also from Smitten Kitchen.  I also for once used ground beef instead of ground turkey!  A was quite pleased :)  Instead of my typical accompaniment of tortilla chips, I decided to make cornbread instead.

K added to the festivities with a delicious cauliflower cake (or "cake" -- still having issues deciding what to call this type of food).  Of course this recipe was *also* from Smitten Kitchen.  Are we obsessed or what? :)

Beef Chili

This was great.  It tasted brighter, a little more spicy, and more "chili"-er than my go-to recipe.  I think we have a new go-to recipe!  Next step is to figure out even more vegetables to add to this.

Modifications: Omitted garlic, used 2 pounds of beef instead of 3, doubled the amount of carrots, added frozen corn (in the last step when you add the bell peppers).

Gripes: I used 80/20 ground beef because it was the cheapest at the store, and found the chili a tad greasy.  Next time I would use a better ground beef or would brown the beef separately and drain off the fat.

Gluten Free Cornbread

Cornbread is one of the easier things to bake gluten free because it is dominated by corn to begin with. I thought this recipe was easy to make and tasted good, although perhaps a little dry.

Modifications: Used a glass 8x8 pan instead of a skillet

Gripes: I felt this was dry, but could be because I didn't check for doneness until the recommended 20 minutes. I think that a few minutes less cooking time would have been better. I'm not sure what temperature my oven runs at, so that could be another issue.

Banana Cranberry Bread

I had a mini banana cranberry loaf in the freezer, so took that out to serve for dessert. This bread is good and a great way to use up leftover frozen cranberries.

Modifications: I halved the recipe and it made two mini loaves (3x5). I omitted the nuts.

Gripes: This banana bread is a lot stickier than most -- it doesn't seem to develop a nice golden crust. Maybe I need to try cooking it longer.